Sker Ritual’s third stage sends players into the depths of a slimy sewer, complete with gooey tendrils and rats. If you need help, let me explain everything in our Sker Ritual Sewers of the Dead guide: Full walkthrough and all objectives.
How to complete every objective in Sker Ritual: Sewers of the Dead
The Sewers of the Dead are less obtuse than the Sker Hotel, but lighting can be a real issue. I struggled with Sker’s visuals until I changed a few graphics settings. If you’re having similar problems, I recommend opening the settings menu and turning the Gamma up past the recommended level. I also turned off Volumetric Fog, which removes the mist and makes navigation much easier.
Your journey through the sewers has multiple tasks, so let me explain them all step by step.
Ascend from Below

Your first objective is to shoot a series of Rat Pods (pictured above) to open a route through the map. Whenever you destroy a pod, the obstruction will clear from a nearby door. You still have purchase access through each one, so traveling will take a few rounds.

A few guns are available in the second room, and I highly recommend staying here until you can buy the MP18A. This punchy SMG weapon will serve you well during the early rounds and is perfectly viable later if you Supercharge it. Shoot every pod you see and follow the path out of the sewers and onto the train. Make a mental note of the Ammo station on the Train, as it will come in handy later.

When you reach the middle of the train, you can destroy a Rat Pod that opens a hole in the side of the carriage.
Open the Box
You’ll find a box outside the carriage. When you interact with it, a small group of Demon Hags will spawn. These enemies are easy to beat with the MP18A you bought earlier. Once every Hag is defeated, you can grab The Plague from the box.

If you played the Sker Hotel level, you know how powerful the unique weapon for that stage is. Unfortunately, the Plague isn’t nearly as strong, although you do need it for mission objectives.

You can use The Plague to break these Shelled Pods (pictured above) around the map. Most of them have Rat Pods inside, which you can shoot to open doors. I backtracked to the spawn room and broke every Shelled Pod on the way. This isn’t strictly necessary, although it does make navigating later on much easier.
When you’re ready, you can break the Shelled Pod in the Carriage by The Plague Box and walk through the train.

You can exit the Train at the front to enter the Sker Island Train Station. Shoot the pod by the gate and go through to reach the Radio Tower. You can use a spiral staircase by the Tower’s base to head underground. When you reach the bottom floor, your mission will change to “Clear the Rat Nests from around the Central Chamber.” You need to use The Plague to shoot any Shelled Pods you find.
I’m not sure if these are random, but I found six on the bottom floor and two on the floor above. Once you’ve broken all eight pods, head to ground level for the next part of the quest.
Doors to the Damned
There are four objectives, and you can complete them in any order you like. Every time you complete one, you earn a key. I’ll explain each task in the order I used, and I recommend following my route as it’s pretty smooth and requires minimal backtracking.
Bull’s Eye

You’ll find a marked control box at the base of the tower. Activate it, and colored lights will appear on the side of the tower above you (pictured above). You must shoot these in the order shown on the control box and repeat this on each side of the building.
The lights move, so it can be tricky to hit them, especially with enemies around. If you’re struggling, you can finish a round by the tower and shoot the targets before the next wave starts.
Ticket’s Please
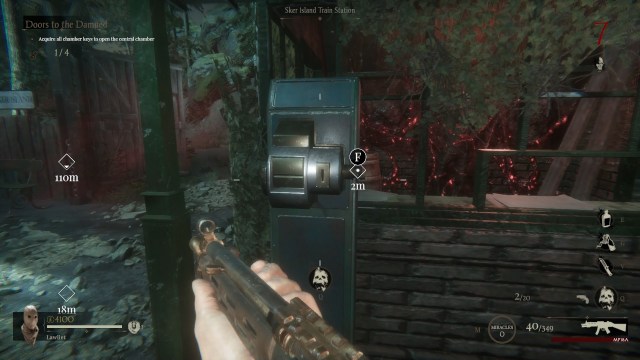
Return to the Sker Island Train Station and interact with the ticket machine (pictured above). Several Speed Freaks will spawn. Whenever you beat one, it will drop a coin. Once you have three, put them in the Ticket in the Machine, which will spit out a card with N.W. written on it.
Your next task is to find a suitcase with those matching initials. Head back to the Radio Tower and down the Spiral stairs. You’ll find a door on the second floor, and it’s identified by the purple canister nearby. Enter it, and you’ll find the Catacombs.
There are Suitcases all over the place down here, and you need to interact with them until you find one with a code inside. Keep in mind the rats on the floor do a lot of damage, so run over them quickly and wait to recover if you need to.

You need to remember the code, so I paused the game here and took a screenshot (pictured above). Retrace your steps and return to the train. There’s a door with a nav marker where you can enter the code. It’s a bit of a pain when enemies interrupt you, so you may want to do this between rounds. Once you’ve unlocked the door, grab your second key.
Leading the Fallen
You can start another objective on the Train, so head to the marked door and grab the Mind Control Helmet. You need to return to the Catacombs, where you found the suitcases. Follow the nav marker and purchase the marked door. Be careful, as a monster behind the door might scare you!

This is the Quiet One (pictured above), and you must lead him out of the Catacombs. He ambles around very slowly, but you can pay him to make the journey much faster. I recommend doing this, but it’s costly.
Every time you pay the Quiet One, he will sprint a short distance. I had to pay 13 times for the Quiet One to reach his destination. Once he’s in place, activate the two valves on either side of the room, and the water down the stairs will drain.
Once the water is drained, you can grab the third key.
Cometh the Monster

The final part of the Key quest is timed. Head to the nav marker near the spawn room and shoot the zombie on the wall in the chest with The Plague pistol. You have two minutes to find the other three zombies.

One is in the Catacombs by the Super Charger room, and you’ll probably need to open the door if you’ve not been down here yet. The remaining two are close together. You’ll find one by the side of the train by the Second Class Coach, and the other is in the ticket booth at the Train Station. Don’t worry if the timer runs out as it just loops.
Open Sesame
With all four keys in hand, head back to the Radio Tower and the bottom floor. Use the keys on the marked doors to unlock the Teleporter. Head upstairs one floor and to the marked purple canister. You must stand in the circle underneath and defeat enemies while you’re there. The circle slowly moves around the room, so you must follow it.
This part took me a while, and there were some unusually long pauses when the enemies wouldn’t spawn. If this happens, briefly leave the area and return. Once you’ve beaten the required amount of enemies, you can take the canister down to the Teleporter to open a gateway to the final boss.
Defeat the Stranger

The Stranger looks intimidating, but the battle is relatively simple. Shoot the boss in the eyes until he disappears. To get the boss to reappear, you must head down the gaps in the floor and follow the tendrils to one of the Wall Zombies. Use The Plague on the Zombie, and the boss will reappear.

Beware the large enemies that spawn when you’re looking for the Wall Zombies. These brutes do a ton of damage if they get close, and I recommend defeating them before you concentrate on your targets. The Plague is actually pretty good against the large enemies, so feel free to use it if they get too close.
The Stranger will disappear twice during the battle, but you’ve beaten the level once you defeat him. You can return to the main menu from here or return to the map and see how long you can survive.
The Sewers story has a few tricky moments but isn’t much harder than the Cursed Lands of Lavernok level. If you’ve got a decent aim and a steady trigger finger, you’ll beat the sewers within a couple of tries.



Published: Apr 23, 2024 6:48 PM UTC