Even the wisest of Ashen Ones needs a little Dark Souls 3 guidance now and then. So, if you’re struggling with gatling laser angel creatures, or lost amongst the windmills of The Ringed City’s Dreg Heap, this guide should be able to help you out.
Part One covers the entrance to The Ringed City DLC to the Dreg Heap boss. It’ll help with directions, enemy types, items (mostly – I doubt I found every single thing), bonfire locations, and offer a few boss tips. The rest will follow in Part Two, once I’ve explored a few more nooks and crannies, and written the thing up. That time is now: here is Part Two.
I played through with a melee-focused Dex (Estoc and shield) character, at around level 90. The pre-release blurb suggested level 125 for this DLC, which to me seems rather excessive. Any end game level character of 80-100 should do fine.
How to Enter The Ringed City DLC
You’ve got two options. If you own Ashes of Ariandel and have defeated Sister Friede (and Ariandel), go and talk to the painting girl in the attic and then return to the boss room. There should be a new bonfire there from which to warp to the Dreg Heap.

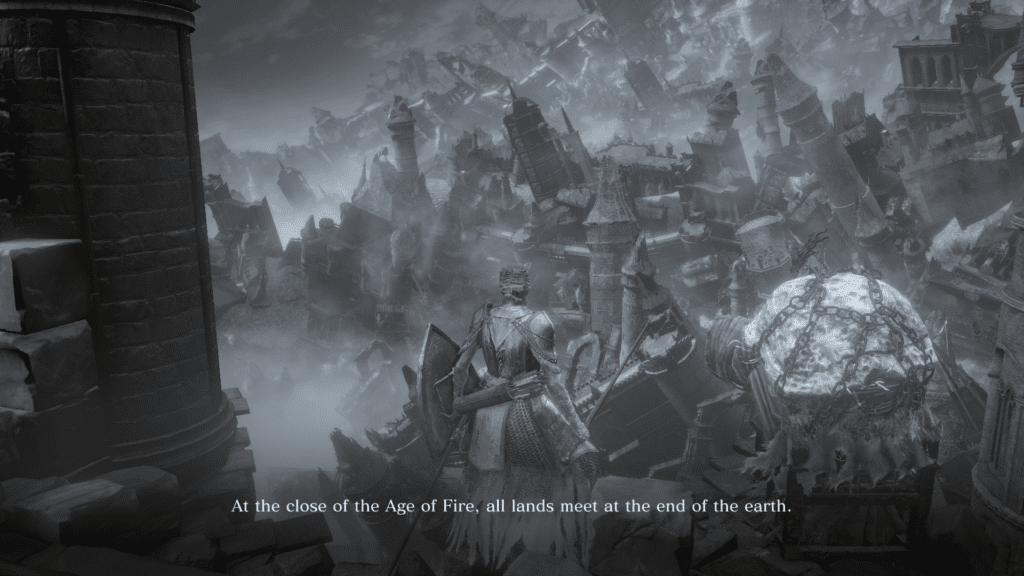
Here’s the one at Kiln, with the original in the background.
If you don’t own Ashes of Ariandel, or haven’t beaten Friede, or just fancy being different, travel to the Kiln of the First Flame (yep, the very end of the game). Turn around and look down the hill a bit and you should see a new bonfire a few feet away from where you warp in. That’ll take you to the same place as the one in Ashes.
Down in the Dregs
Welcome to the Dreg Heap. Enjoy your stay. Have a chat to the Pilgrim Lady before you follow the developer message and drop off the ledge. She’ll tell you a few things, and sell you stuff – including the Splitleaf Greatsword if you fancy such a weapon. You can return here once you reach the Ringed City itself for some new dialogue. At some point (probably once you’ve triggered the final boss fight), she’ll die. You can then get her ashes and give them to the Handmaiden at Firelink; who will promptly accuse you of murder.
Anyway, dropping down from the ledge will get you attacked by many crawling horrors known as Murkmen. Plus a couple of caster Murkmen who’ll shoot magic at you. The standard Murkmen aren’t too bad – but they do hit fairly hard if they catch you. Casters are fairly standard, but some of them have a weird attack where they turn into a sort of sentient cloud (which looks like a larger version of the mini Humanity creatures from the first Dark Souls Artorias DLC) and launch themselves in your face.
Take a left and up some stairs to face a fatty with no face who you’ll later learn is a Harald Knight. He’s guarding a Titanite Chunk and (up the stairs again), the Aquamarine Dagger.

Someone call Troy Tempest, because I just found Aqua Marina.
Go back the other way and approach the tempting item on the exposed ledge which totally isn’t a tra … oh dear, you fell down.
Now you’re in a ruined library area with more Murkmen. At least one of the casters in here will do the evil cloud trick at you. More regular Murkmen will appear periodically too. Go up the library stepladder and over into the enclosed area to get the Murky Hand Scythe.
Leave by the only exit to meet what will probably be your most awkward nemesis in this first area: the Laser Angel creature. I have no idea what these are officially called (maybe they’re super evolved Pilgrim Butterflies?), so Laser Angel will have to do. They’re always mad as hell and, when they see you, will gatling cannon laser fire at you. You can permanently kill them, but for now there’s some useful cover to cower behind just after the drop (and a Divine Blessing item).
Run and hide behind the house, but watch out for the lone Murkman who’ll try to drag you down. If you follow the wooden platforms around the side of the building, you’ll find the Ring of Steel Protection +3 … and probably die while retrieving it. So you may want to hold off on that one for a bit.

Don’t be like me, stay away from Murkman grabs.
If you go through the other entrance, you’ll find a pair of Lothric Knights, guarding the Soul of a Crestfallen Knight. Dispatch them and continue on through another entrance to wind up by a fountain. If you head to the right, beyond the fountain, you’ll find some rooms full of (apparently) endless Murkmen. In the final room there’s a Murky Longstaff to claim.
Opt to go the other way at the fountain and you’ll head towards the gaze of the Laser Angel again. You’ll notice that a tower has collapsed too.
Instead of heading onward, turn back to the room the Knights were in. It now has a missing wall and a route for you to take across the newly fallen tower.
From this vantage point you’ll be able to see a weird creature in the courtyard below. This is the Laser Angel’s dirty little secret, and weakness. Pump it full of arrows, or spells (or go down there yourself if you have to) to make the flying terror disappear from this area. Hurrah! Then go across the tower and chat with a chap named Lapp.
After that you can continue onward to a point where you can do a devastating drop attack on a hapless Harald Knight, or make your way back to the point where the tower fell.

There used to be a wall here.
Either way you’ll end up in another gauntlet of Murkmen and ultimately find another cliff edge to drop off. A developer message assures you that you won’t die, and, despite the very long fall, this proves to be the case.
Dead ahead you’ll see the Ruined Earthen Peak bonfire. Wait a second … Earthen Peak? Yep, we’re in Dark Souls 2 territory. Sort of.
Earthy Peaks and Windmills
If you talked to Lapp earlier, he’ll be here now. He’s squatting (hmm, suspicious) on a little outcrop of rock to the right of the bonfire (as you look at it from where you dropped down). He’ll talk to you about some exciting treasure in an upcoming swamp.
Up and to the left you’ll find some Back Firebombs guarded by those familiar Dark Souls mushroom insect creatures.
Everywhere else in the immediate area is guarded by another Laser Angel. Duck in and out of the scenery to avoid his gaze as much as possible. You can stealth around to some extent when his back is turned, but it’s not an exact science.
To make things easier for yourself, it’s probably best to go after the thing projecting this Laser Angel. Assuming you’ve approached the area with several shacks on the main pathway, you’re probably hiding behind a wall right now. Dash to the hut in the center, then wait for the Laser Angel to get distracted shooting at the poor Thralls. Follow the one which survives into the hut/cave place, and kill him.

This is the one you want to be heading towards (drop off to the left side).
From here, you need to make it to the shack that’s out on the edge of the cliff (on the right). When you reach it, hug the left hand wall as closely as possible and walk off the ledge. You should just land on a tree branch below. If you miss it, you should at least get a decent idea of what you’re aiming for now.

And this is the prick you want to be brutally assaulting.
Walk along the branch and you’ll find the bizarre creature that projects the Laser Angel. Murder the hell out of it to get that other Laser Angel out of your life. From here, progressing further up the tree branch will ultimately lead you above the hut/cave you were in with the Thrall, and to a developer message encouraging you to drop off a ledge again. That’s actually a direct route to the Within Earthen Peak bonfire and the area boss, if you want to head there right away.
If not, head back to the now much safer area with all the shacks. In this part of the level you can find the Desert Pyromancy Garb by one of the left-hand huts. There’s also the Giant Door Shield down a cliffside pathway near the hut you dropped off to reach the Laser Angel’s creature. Watch out for a sword Thrall in a little alcove there.

You need 45 Strength to use it, but it looks fun.
Next, go through that hut/cave area and towards yet another lovely Dark Souls 3 swamp. Mm, poisonalicious! Around this place you’ll find the other parts of the Desert Pyromancy set (skirt, gloves, etc). In the lower part of the swamp you can also find the Ring of Favor +3 and (in a cave guarded by mushroom insects and a pair of Harald Knights) a Titanite Slab.
If you miss the latter item, Lapp will retrieve it for you at some point (I’m not sure what the trigger for that is, but if he’s moved from his first spot at the bonfire to be closer to you then have a chat with him).
Problem is, there’s another Laser Angel in this area, making item retrieval a pain in the arse. This one’s avatar creature thing is on top of the windmill in the far corner (as you look out from the way you probably entered) of the swamp. Your route up is going to be a tree branch that starts near the base of the windmill.
Getting there is not easy when the Laser Angel is interested in you. Your best bet is to try to hug cover and either work around the left-hand fringe of the swamp, or get to the cave with the pair of Harald Knights and then work your way closer from that side instead. There’s honestly a bit of luck to the whole thing, so prepare to just die at least once or twice.

HIT ME WITH THOSE LASER BEAMS. Actually, on second thoughts, please don’t.
Once you manage to reach the branch at the base of the windmill follow it up until you reach (and kill) the Thrall with the deep infused sword. Turn around, kill another Thrall, and make your way across the rooftops to the next upward curving branch. You should find the avatar creature there. Once that’s dead, exploring this whole area is a lot more straightforward.
Around the back of the windmill, at the ground level, you’ll find a Harald Knight guarding the Harald Curved Greatsword.
If you go back up the branch walkway to where the Thrall with the deep infused sword is/was, you’ll find Desert Pyromancer Zoey and her two Thrall buddies. Separate the Thralls off from her before attempting an assault. She has fireballs, a fire fan attack, and a nasty whip. She’ll also use Estus flasks twice before she’s out. Kill her, and you’ll get the Flame Fan pyromancy.

In reality I ran away and shot her with arrows. Sorry Zoey.
To make it to the next bonfire from here, just follow the branches until you can drop down to the point you’ve probably already reached when killing off the first Laser Angel. Take the long drop, and you’ll be at the Within Earthen Peak bonfire.
Demon Pals
From here you can drop inside a large hollowed out tree to meet the Demon in Pain and Demon from Below. They are delightful fellows. Beside the bonfire you can summon Amnesiac Lapp and Slave Knight Gael if you want some AI help. Other co-op players are, of course, also an option.
Somewhat fun fact: the Demon in Pain used to be called ‘Crimson Bat’ in early translations. Anyway, these guys will both attack at once and take it in turns to be powered up by flame (they can briefly both be powered up sometimes, but it doesn’t tend to last long before one flares out).
Whichever happens to be the flamed up guy of the moment will always be more aggressive, while the other one will hang back and spit toxic stuff at you.

Not pictured: the other one, about to slap me around.
This first phase (yep) is much, much simpler with a helpful buddy. Either a co-op summon, or one of the NPCs (Slave Knight Gael, Amnesiac Lapp). Of the two, Gael seems better at holding his own. With a friend, you only have to concentrate one one demon, which is pretty easy.
They only really attack from the front, so if you stay around the back legs or rear you’ll be pretty fine. Just watch out for when they hop back and try to put some distance between you (close the distance and dodge any incoming slashes).
If you do want to take them on solo, then the same advice applies but you’ll have to contend with juggling the pair of them. That’s mostly a case of dodging the extra toxic stuff that’s coming your way from whichever one is currently in that mode. Not exactly simple. Try to keep them somewhat separate as much as you can because the toxic spitting one will slash at you if it gets in close.
There isn’t really any ‘trick’ to this phase (unless you count co-op as a trick). Just good old fashioned move-set learning. Again, as long as you’re around the back or side of one they can’t do much. If you hit either one enough that they slump to the floor, you can stab them in the face (riposte) for a lot of damage.
When you kill the last of Demon in Pain or Demon from Below (whichever one is alive the longest), they’ll turn into the Demon Prince. He’s a bigger, badder version of the other demon lads and has an expanded move-set.

Show off.
If he takes to the air, he’s either going to lob a fireball at you, or do a low straight swoop with a trail of fire, or retreat to the back of the arena. If he does the latter, he’s either going to summon a portal of fireballs (fun!) or do a laser fire beam of death at you.
You can avoid the second one by just being out of range (at least for the general sweep, dodge the second part as that’s aimed right at you). The portal of suns is … a problem. I never really figured out how to dodge that one consistently. I think keeping your cool and trying to dodge late might work?
Good windows for attack on this guy are after he does the classic Dark Souls ‘bellyflop’ move, or (like with the prior demons), if you can get around the back legs, tail or rear when he’s slashing at you on the ground. He only seems to have one rear protection move which sometimes comes out at the end of his moving ground pound combo (he’ll spin and slam his left fist down). If you can reach him when he’s standing still summoning portals or fire-beams, then that’s good for a couple of stabs too (just get out of the way of any fireballs that might be appearing soon).
I tried this boss both solo and with NPCs, and had most consistent success taking just Gael (this was pre-release, so no online co-op was available). He made phase one a breeze, and tended to survive at least halfway-to-two-thirds into the Demon Prince fight. That distraction is very useful.
I’m not sure if elemental damage will help much here. Fire, for obvious reasons, definitely does not. I was using Bleed, which may have helped a bit, but I didn’t notice dramatic effects. Frost magic or weapons would probably be worth a go, given the nature of these bosses.
Like the other demons, you can go for a riposte face-stab on the Demon Prince if you ever deal enough damage in a row to make him slump over (this can be a godsend if you manage to do it while he’s summoning his sun portal or fire orbs, because it sometimes knock him out of that attack).

The gargoyle taxi service to The Ringed City have very specific ID requirements.
Your reward for triumph will be the Soul of the Demon Prince, which you can convert into either the Seething Chaos pyromancy, or a curved sword (which has Faith/Magic requirements) called Demon’s Scar. Fancy.
From the Demon Prince bonfire that appears after the fight, you’ll be able to pick up the Small Envoy Banner. Use it on the cliff edge to be carried away to a wonderful world of adventure in The Ringed City itself. We’ll get to all of that in Part Two.


Published: Mar 28, 2017 04:53 am