One of the many collectibles you will come across in the Pale Heart in Destiny 2 are the very mysterious and often hidden spirit feathers that will be spread across the eight different locations in this new destination. Don’t worry, though, I have compiled each of them for you so that you don’t have to suffer from a very long and, at times, frustrating collect-a-thon.

Alongside each of the feather screenshots, I’ve created a map for each region that will point toward the feathers’ locations. It’s worth noting that only 49 feathers are available right now. When we get access to the rest, I’ll update this guide. Without further ado, here are all the 55 Pale Heart feather locations in Destiny 2.
Table of contents
The Lost City Feather locations
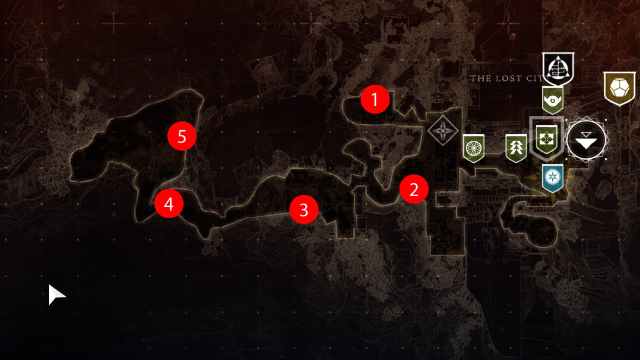
The Lost City has five feathers. Use the map above to see where every feather is in The Lost City.
The Lost City Feather #1

Let’s begin our journey with The Lost City, located below and to the west of Micah-10 and the Arbor of Light which is also known as the place where you bring any Ghosts you come across in your travels across the galaxy. Once you get to the first area, take a right and jump across some platforms, this feather will be on top of a tree trunk sticking outside a building.
The Lost City Feather #2

The next one will probably be a bit more easy to spot. It is located at the second platform of the first area — this time, go left — a place you might have visited before where you overloaded some runes with your sword block. Take a look up and you will see the feather on top of an A/C.
The Lost City Feather #3

From this point on — only for The Lost City — you won’t be able to find your Guardian location on the map. Bungie does this for a few zones in Destiny 2, so keep using the pictures as reference. Continue down the road and you will get to another area where you used your sword to overload some runes behind some energy shields. The feather is on top of a tree to the left.
The Lost City Feather #4

Continue to move through the platforms down the road and you will be at a place filled with vegetation and a beach. Don’t get too excited since there is a feather on top of a giant tree root right in the middle of the way to the beach.
The Lost City Feather #5

Once you get to the beach, keep moving forward and you will see a giant tree sticking out of the rocks on top. The feather will be waiting next to the tree trunk on top of a rocky platform. This will be the last feather in The Lost City.
The Landing Feather locations

The Landing has eight feathers to collect. Use the map above and the images below to collect them all.
The Landing Feather #1

Our next stop is The Landing. Right next to the fast travel point, you will find a couple of colorful buildings with a feather right on top of a rooftop.
The Landing Feather #2

Move south and you will find another feather on top of a platform next to a tree. Time to do some jumping!
The Landing Feather #3

Travel northeast past the Stitching chest and you will see an entrance to a cave. Inside it, you will come across a hole in the ground, with the feather lying below, waiting for you and expecting you to not fall to your death.
The Landing Feather #4

Head back toward the direction of The Landing fast travel point and go to the ledge facing the ocean. You will notice a pretty fancy balcony sticking out – I’m jealous of such luxury, to be honest. Get inside the room and the feather will be there, enjoying a comfy rest.
The Landing Feather #5

Continue east and don’t stray from the edge of the map. You will eventually see some leafy platforms sticking out like the balcony. One feather is there, clinging to life. It’s time to save it.
The Landing Feather #6

In the northeasternmost part of the map, past the bridge, you will see one feather in the distance, ready to dive down to the water below. This is a tricky jump, so time it accordingly so that you don’t beat the feather in a diving conquest.
The Landing Feather #7

Did you think you were rid of deadly jumping? Wrong! Below the central platform in the bridge, another feather will be waiting for you for a diving contest too. Cautiously jump toward it and collect it. I promise this is the last deadly jump in this feather-collecting trip — Narrator: it wasn’t.
The Landing Feather #8

The last feather in the Landing can be found at the southeasternmost part of the map, right inside of a cave. Be careful, though, there is a special Overthrow objective here with a lot of enemies that will make your life impossible. Either collect it fast or fight the foes here and collect it.
The Refraction Feather locations

The Refraction has five feathers and they aren’t too difficult to find with our help.
The Refraction Feather #1
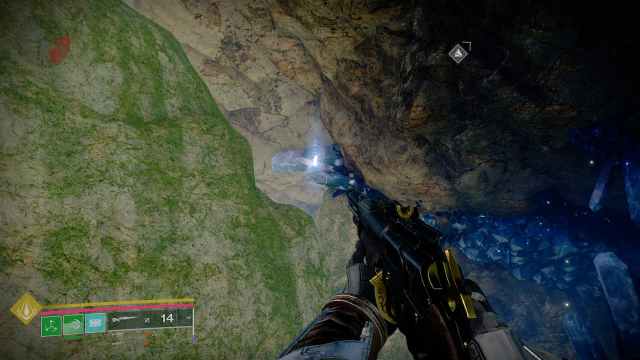
The Retraction feathers are a bit easier to spot. Right at the entrance of the green area, you will find one feather just chilling on top of some crystals.
The Refraction Feather #2

Once in the main area of The Refraction, turn to the right and up and you will see another feather on top of a rocky formation. Collect it and use its resting place as a surveying point, you will probably spot more feathers from there.
The Refraction Feather #3
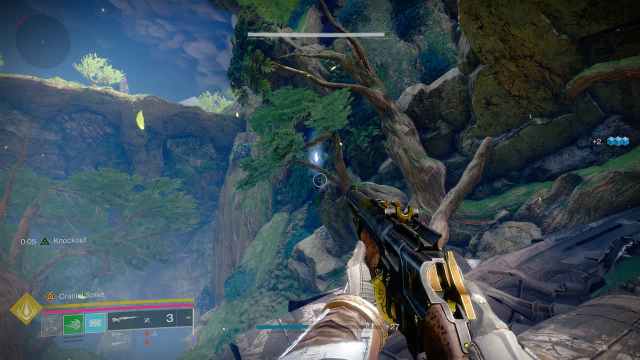
Right in front of the previous feather location — to the southeast — you will find another feather on top of a tree branch.
The Refraction Feather #4
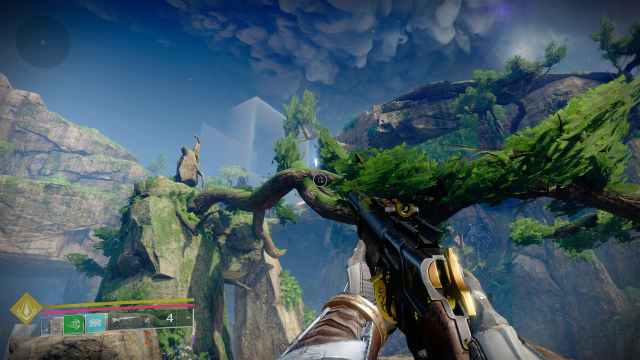
Continue southwest and you will spot a feather on top of a tree branch, again. This time you will need to time your jump accordingly again, so keep that in mind before you venture blindly into the abyss.
The Refraction Feather #5

Finally, before you enter the south crystal portion of The Refraction, take a look up and left and you will spot the final feather in the area.
The Blooming Feather locations
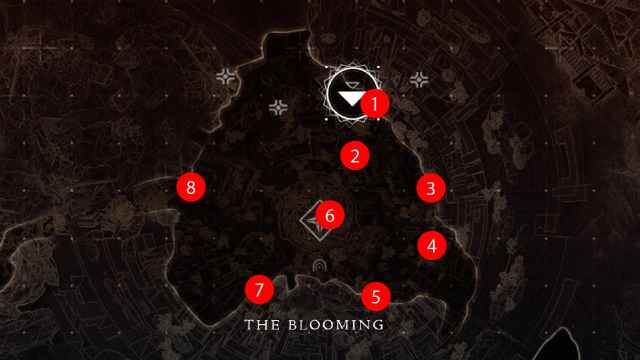
The Blooming is a big area that contains eight feathers.
The Blooming Feather #1

The Blooming isn’t as easy as The Refraction in terms of feather location, but it is still pretty simple to spot these across its different areas. Find the first feather right next to the fast travel point.
The Blooming Feather #2

While heading to the center of the map, you will see the second Blooming feather on top of a tree which for whatever reason gave me an extremely hard time getting on top of (I hate these precise jumping shenanigans).
The Blooming Feather #3

Stick to the right border of the map and you will notice a feather just on top of a rocky opening.
The Blooming Feather #4
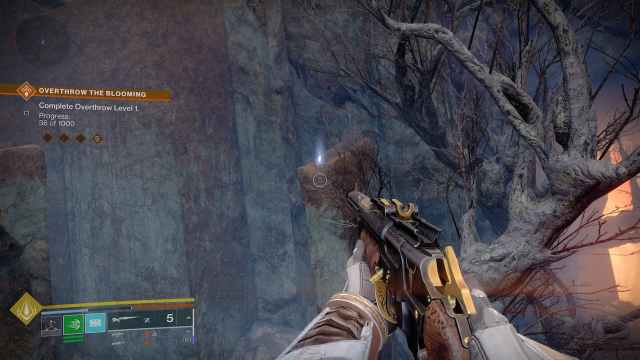
Get through that opening and you will probably spot the two feathers in this rocky and dead-like area, barren of everything green. Use the tree on ground level to get to this feather, waiting on top of a pillar.
The Blooming Feather #5
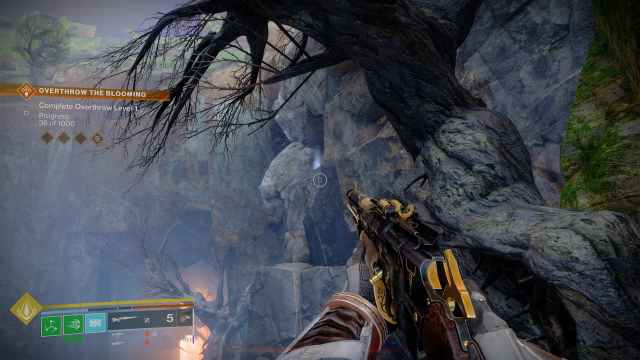
The next one is a bit trickier to get to. Again, jump up toward another dead tree and jump across the gap to the rocks on top. The feather will be on top of them.
The Blooming Feather #6

Head toward the middle of The Blooming to an area under tree roots and you will find one of the feathers waiting on top of one of them. Beware of minor enemies surrounding it.
The Blooming Feather #7
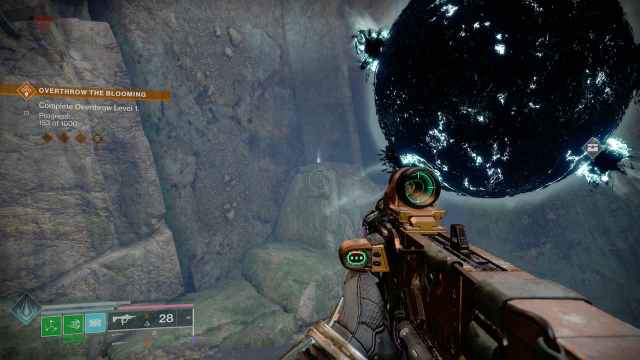
Head southwest and you will see one feather on top of some rocks in the distance, just next to the border of The Blooming. Note that the huge Taken sphere here is from a special objective, so it may not appear for you.
The Blooming Feather #8
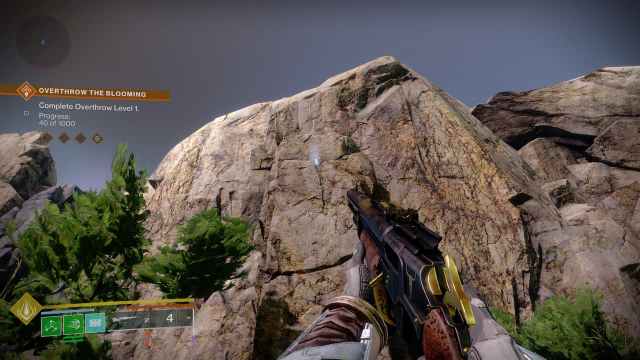
Finally, the last Blooming feather will be resting on top of a rocky platform right next to the entrance to the southern part of The Refraction.
The Seclusion Feather locations

The Seclusion is a bit easier than The Blooming with only five feathers to collect.
The Seclusion Feather #1

The Seclusion is by far the easiest zone to collect feathers from, so you might want to visit this area first if you are looking to complete the feather Seasonal Challenge and get some juicy XP. The very first feather here is on top of a tree trunk, just in front of The Seclusion’s entrance, that is, past the indoor portal.
The Seclusion Feather #2

Just north you will spot another feather on top of some rocks. No deadly jumping here, just some annoying enemies that will not let you take a decent screenshot.
The Seclusion Feather #3

Now, turn your view toward the gray sea. You will now notice more clearly the influence of The Witness here. While you contemplate your life, head toward it and you will find a feather on a rocky platform below. No, you can’t swim in the toxic sea.
The Seclusion Feather #4
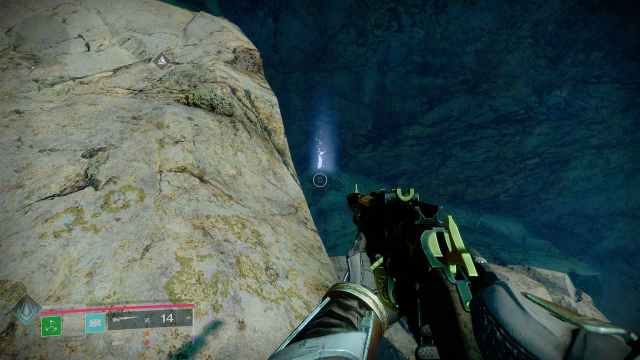
Since you are already on the shoreline, head east along it and you will find the next feather just next to the entrance of the eastern Seclusion cave.
The Seclusion Feather #5

The final Seclusion feather is located inside the cave. Just walk across it until you reach a noticeable fall to your death. Yes, another deadly jump toward the feather just standing on top of a rocky platform.
The Divide Feather locations

The Divide has only five feathers, but I find this area tricky since there’s a lot of vertical climbing.
The Divide Feather #1

The Divide is where I spent most of my time in this feather-collecting marathon. Note that the numbering is just for reference and will probably change if you visit this area from The Impasse. The very first feather you will come across is on the way to the peak of The Divide. Just take a look at the abyss and you will find it hidden on top of the snow on a platform next to the cliff.
The Divide Feather #2

Continue your climb through the various platforms and oddly placed cars and head to the location depicted in the map above. There is a big and thin ice cliff you will need to climb, with the feather resting on top.
The Divide Feather #3

Continue north and take the pathway to the right below a tunnel. Once you leave it, turn your back and you will see the feather on top to your left.
The Divide Feather #4

Before you venture inside, you will notice this feather waiting on some frozen structure you will soon find out to be the giant EDZ building.
The Divide Feather #5

Whether you approach this through the opening in the mountains near the second feather or north of the fourth, this feather is on a platform in the room filled with giant pipes. Just don’t fall to the platforms at the bottom since it is located right in the middle between the top ones and the bottom ones. Since you’re here, you might as well complete the Divided Prismatic chest key puzzle to get another Prismatic Fragment.
The Impasse Feather locations
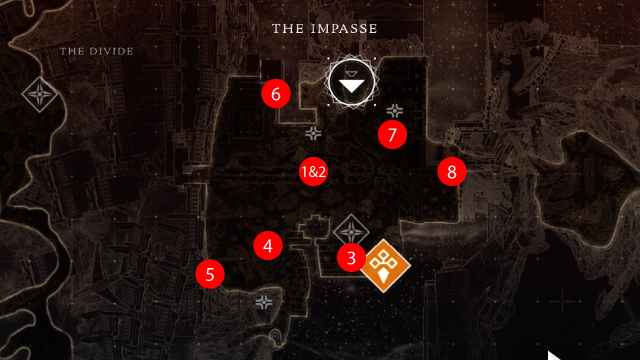
The Impasse is the second to last area that holds eight feathers. Let’s get it.
The Impasse Feather #1

The second to last zone we will visit in this journey is The Impasse which will have its feathers well distributed across the area. The first one is just at the center of the map, on top of a lamppost that saw its lighting days a very long time ago.
The Impasse Feather #2

Don’t move from this spot just yet. Just below the destroyed freeway in the ground, you will find another feather resting on top of a creepy hand sticking out of the roof. There are lots of enemies that don’t like screenshots either here, so clear them first if you don’t want to suffer their annoying nature as I did.
The Impasse Feather #3

Head south just next to the Overthrow icon in the map and you will see yet another feather on top of a tree. Man do these feathers love trees — now that I mention it, birds love trees, so it makes sense. My mind is officially blown.
The Impasse Feather #4

Travel west and you will see a feather sitting on top of a rocky edge. No smart remarks here, don’t worry.
The Impasse Feather #5

Continue to the northwesternmost corner of The Impasse and you will find the feather sitting on top of some rocks. There is a chance you will see some Taken spheres here too, so use them to reach this feather or, if you don’t, the rocks next to it. This is close to a difficult-to-find regional chest.
The Impasse Feather #6
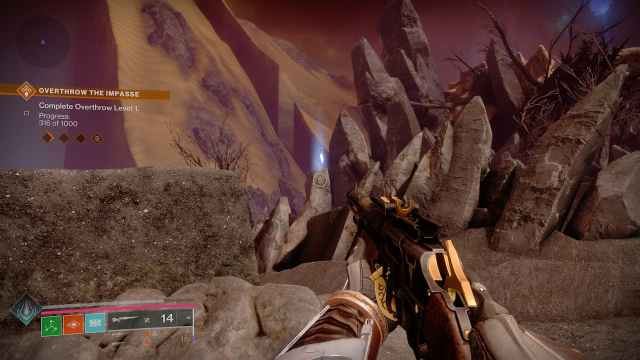
Travel all the way north and you will find a feather on top of a pillar that is shaped like a finger. No worries, this won’t be the last time we see something like this.
The Impasse Feather #7

Head east and you will encounter a very particular pillar with a feather on top and a pyramid-like structure with a head sticking out of its walls. That face is of a man not enjoying his day whatsoever. Use the head to jump on top of the pillar.
The Impasse Feather #8

Walk even more to the east and right on top of the right pillar of The Transgression entrance you will see one feather hiding on top of a hand. Use the pillars and formations around to reach it.
The Transgression Feather locations

The final region, The Transgression, has five feathers.
The Transgression Feather #1

The Transgression feathers are a great way to finish this journey since they are extremely easy to spot. The very first one is next to the entrance of The Transgression. Remember the finger pillar we saw earlier? Well, this feather is on top of a fragmented finger, so we have definitely upgraded our hiding spots.
The Transgression Feather #2

North of the previous feather you will see the last feather on top of a tree, just waiting for you.
The Transgression Feather #3
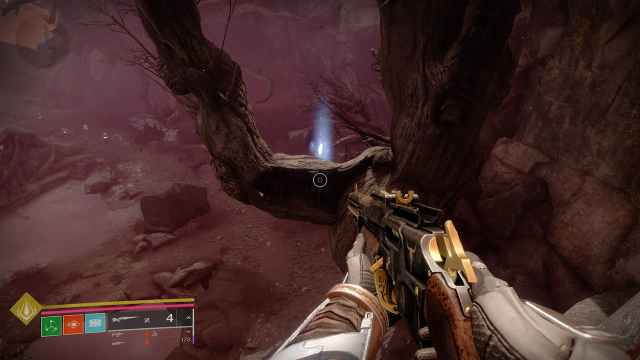
I lied. The next feather is located on top of another tree branch right next to the entrance of the eastern area in The Transgression. This is the last tree one, I promise.
The Transgression Feather #4

This feather is on top of another weird hand sticking out of the rocks. Just head southeast from the previous feather location and you will spot it, it is pretty noticeable.
The Transgression Feather #5

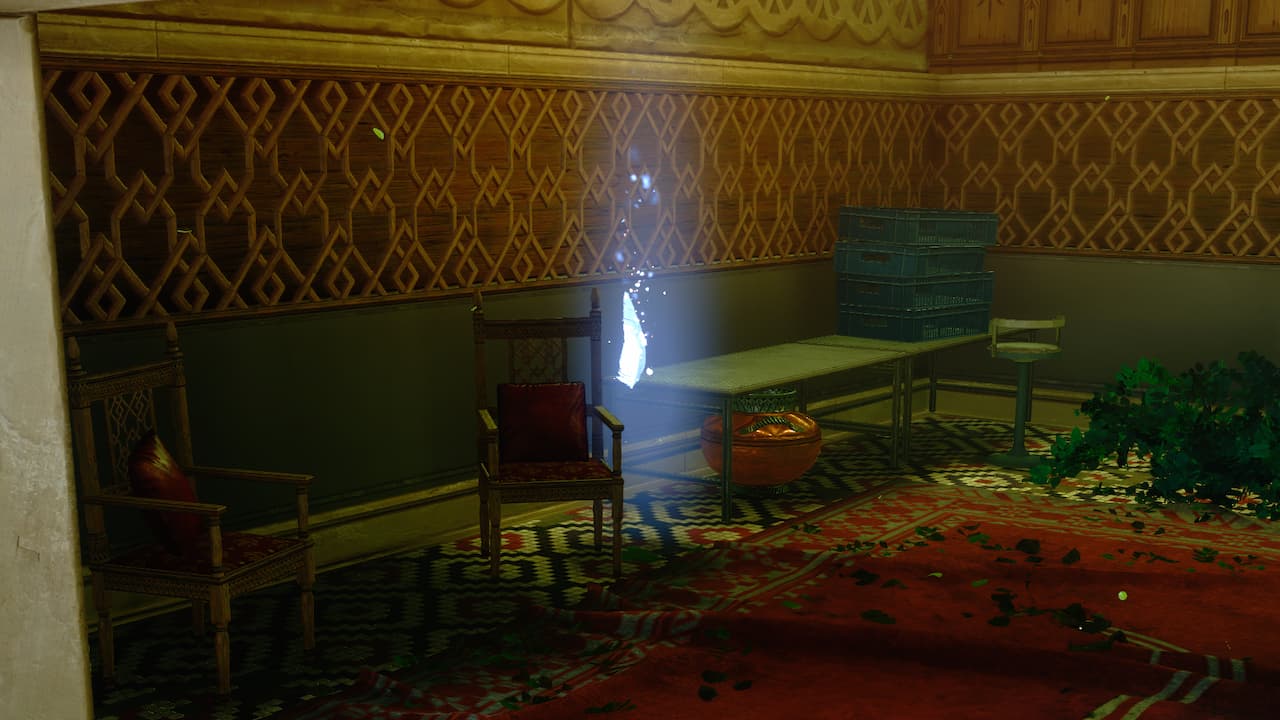
Our journey is finally over. The very last feather in The Transgression is located inside the eastern building past the sandstorm. At the entrance, you will find it on top of the left statue.
Dual Destiny Feather locations

The final six feathers location were originally a mystery and many thought that the ones found in the Cysts were bugged. However, now we know that there are six feathers in the Dual Destiny 2-man mission. The whole unlocking process is a whole beast on its own, so make sure to check out our guide on how to do so. I will now list the feather locations using visual queues given that the location of the feathers is exclusive to the mission.
Dual Destiny Feather #1
Once you start the Dual Destiny mission, you will appear on top of The Refraction. The first feather is just below you inside a cave down in front of you.
Dual Destiny Feather #2
Travel north in The Refraction and look down once you hit the edge of the floor. You will see the feather on top of a branch.
Dual Destiny Feather #3
Progress through the mission and arrive a The Intrusion. Once you hit the stairs depicted above, climb them and then look for an opening on the right side of the next room. Go through the corridor and find the feather inside.
Dual Destiny Feather #4
Further inside the Intrusion in the room with both Light and Dark plates, turn around to see a platform in the middle of the room. Turn to the left and you will see the feather standing on a platform.
Dual Destiny Feather #5
Once you hit the giant tree in The Intrusion, walk forward until you reach the glowing red entrance. Turn around and head forward through the tree trunk and you will find the feather.
Dual Destiny Feather #6
Lastly, locate the eerie hands in The Intrusion, turn back, and find a tree root going down the platform. The final feather will be below, waiting for you to collect it.
And there you go! Finally, you have every Pale Heart in your collection – as long as you find a partner for Dual Destiny. While it was theorized that it might contain the original missing six feathers, you can still check out how to beat Salvation’s Edge, The Final Shape’s Raid. Believe me, you will need some major guidance if you go in blindly.




Published: Jun 12, 2024 5:09 PM UTC